
Some devices are programmed to send SMS. Onomondo's network is set up to secure SMS channels by only providing SMS access through the Platform or API. To use SMS you will need to use Webhooks to catch SMS when you are not on the platform.
Before you start
You will need to find a 3rd party app connection service or build your own HTTPs server endpoint to connect the webhook event sent by Onomondo to the specific notification service you want to use. Some common app connection services are:
This example uses Integromat. It has a free version that includes the webhook service and gives you more options on how to present the notification in the service of your choice.
Before starting, it will also be good to understand the basics of using SMS through the Onomondo Network:
Contents
- Setting up for the test
- Setting up Integromat
- Creating a Webhook on Onomondo
- First test of Webhook on Integromat
- Creating a JSON object for the SMS response
- Sending the SMS using Onomondo's API
- Test sending the SMS response
- Adding extra logic to the Scenario
- Turning on the Scenario
Setting up for the test
A simple way to set up the test is using the SMS feature on a mobile phone using one of our SIMs. Once the automation is set up you can test and configure further using your actual devices.
What phone number to use? We suggest using an number with an international prefix. This is how we will receive the SMS in our SMS server and how it looks in the webhook event.
If your device is sending an SMS to a specific phone number/service, you can use that in the test as a good example on how our Webhook operates.
It is a good idea to also add a Tag to the SIM you are testing. During development it is helpful to limit the SMS events being sent from the webhook to your test device. In production Tags can also be used to have different end points/webhooks for different products/customers allowing you to customize your setup.
In this example the SIM will use a Tag we have created called "GlobalTrackerUnit".
Setting up Integromat
There is a little initial set up required. Once you have created a user for Integromat, create a new Scenario and click on the initial module and select "Webhooks".
You will need to select the Add button to create a new Webhook and give it a name. In the example we use "smsFromDevice".
Afterwards, you can copy the url of the newly generated endpoint. You will need it when you create your Onomondo Webhook.
Creating a Webhook on Onomondo
Once you have the url of the webhook go to the Webhooks page on the platform and click the "New webhook" button.
Webhooks is a management feature and can only be created by Admin or Owner user types.
Give the webhook a name and paste the url of the Integromat (or other third party app). In the example we also restrict the Webhook only to send events related to the Tag "GlobalTrackerUnit".
This Webhook only needs to send one kind of event. Deselect all events except for "SMS" and then click the "Create Webhook" button at the bottom right of the page.
Make sure you pick SMS and not "SMS Usage". Only the first one will provide the SMS being sent from the device.
First test of Webhook on Integromat
Once the Onomondo Webhook is created go back to Integromat and click the "Run once" button.
Now send your first SMS. You will see a bubble pop up from the Webhooks module. You can click this to get a break down of the data received by the Webhook module.The Webhook module uses this initial packet to identify data structure it will expect in the future.
No webhooks received?
If you did not see a response come through to Integromat check the error log page on the Platform. This will show you the most recent errors for Onomondo Webhooks and Connectors.
Congratulations! You can now receive SMS from your devices.
As you can see in the example the phone number of the SMS becomes the "to" field in the SMS event and the body of the SMS becomes the "text".
How you set up the remaining automation will depend on your specific use case. As mentioned already, this example will demonstrate how to automately send responses based on SMS a device sends.
Only want notifications?
If you want an example of receiving notifications when a SMS is received, try adapting the Usage Alerts example using a Webhook with SMS events.
Creating a JSON object for the SMS response
As mentioned earlier, you will need to use the API or platform to send SMS to a device. In this case, we will be using the API. Look at our documention to see how the Post SMS API request is structured.
As the response body will contain JSON it is simplier to use the "Create JSON" module then try and correctly format the text in the HTTP Module (see below).
In this module you first need to set the data structure of the JSON. Click the "add" button. In this example it is named "sendSMS". You will need to specify two need fields:
- "from"
- "text"

In the from field you can take the "to" field from the event. In this example, we are sending a response to the device with the APN. This information goes into the body of the text. Type in onomondo (remember all lower case).
Sending the SMS using Onomondo's API
To send an SMS using Onomondo's API you will need to select the HTTP module "Make a request". As described in the POST SMS documention, you will need to set the type of request to "POST" and the url to:
https://api.onomondo.com/sms/
At the end of the url, you can select the sim_id field from the received SMS event.
Add a Header "Authorization" with an Onomondo API key.
Creating an API key on the Onomondo Platform
You will need to have an API key to use Onomondo's API. It is quite Simple to create a new key on the API page on the Platform. When creating a key you can limit the access to the API using a Tag.
In this example the "GlobalTrackerUnits" is read only limiting the type of requests the API key can be used. It also limits the responses to SIMs (and possibly other objects) that also have the same tag.
Once you have clicked "Create API key" copy the full key and paste it into Integromat.
Beware: For security purposes the API Key in full is only seen once. If you fail to copy it or lose it you can just delete it and create a new one.
Paste the API key into a "Authorization" header you have created. Next, select the Body type as "Raw" and the Content type as "JSON (application/json)". Finally, in the Request content field select the JSON string in the pop up window and click "OK".
Test sending the SMS response
Once you have set up HTTP module save the Scenario and click "Run Once". You will need to send a second SMS to see if you get the expected response. Bubbles is pop up next to all modules showing the input and output of each of them, followed by s reply SMS delivered to your test device.
No Logic built in: At this stage you will always get a response when an SMS is sent. Any SMS from a device will respond the same way.
There a couple of ways to add logic to this Scenario. The most basic is to use an if statement in the JSON Module to change the text reponse based on the SMS from the device (see the setting up notifications section on usage alert webhook example of inspiration).
Sometimes you want to create different actions depending on what the device is asking. To do this you can use another Integromat feature called the Router module (see next section).
Adding extra logic to the Scenario
In this example, we are going to show how to use a Router module to set up the Scenario to only send the APN when the specific request comes from the device, followed by a catch all statement to send an email notification if another SMS is sent to the device.
First go down to the green "Tools" button and select the Router module. You will need to unlink the existing flow between the Webhooks and JSON modules and insert the Router in between it.
Next, add a filter on the link between the Router and JSON modules and set the Condition to be the "text" field in the Webhooks event to equal the SMS command the device sends to request an APN. In this example we are using "getAPN". You can give this filter a Label.
Afterwards, add a filter to the second flow out of the Router module. First, give it a Label. Then click the check box under the Label field enabling the fallback route. This is instead of setting another condition.
Adding a Notification to the Scenario
The last step to adding a fallback is to create a notification of your choosing. In this example the Gmail module was selected but there are multiple other modules including a generic email, Slack, Microsoft Teams and others depending on your preference.
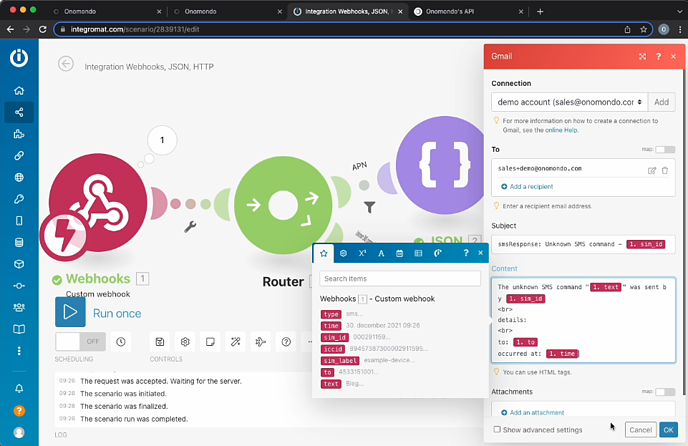
If you would like a deeper walkthrough in setting up the notification and using some of the different Integromat features we suggest looking at the Setting up notifications in Usage Alerts example
Adding more logic steps
Once this is set up you can add more steps depending on what is already programmed on to your devices. If you are developing your device you can start to decide what you want to build into the device using SMS functionality.
A simple way to add new routes to the Scenario is by clicking the plus sign in the Router module, copy the JSON/HTTP modules from the previous example and change them as required and set a new filter. You can also add different steps/API calls to the flow if you want to pull different information from different parts of Onomondo or other Services/API calls that are valuable.
SMS is not always the best choice: Depending on how you are setting up your device, it may not be the best or cheapest way to set up your device. For example, have a look at the ability to send packets to the device using Messages API call.
SMS can be a good back up way to communicate to the device when it fails to connect to data but does still connect to GSM. One example, adding logic to the device that restarts the device or module when it receives a specific SMS.
Turning on the Scenario
Once you have gotten the logic set up as you prefer go ahead and save it and turn the Scenario on. Select "immediately", so the scenario runs every time the event is received instead at specific time intervals.
Once it is online run a few extra tests with different SMS commands you have set up and even test it with one of your devices by adding the Tag you are using for development. Congratulations, you have set up a SMS server for your devices.
Don't forget: Change the Tag from development to Production on the Webhook and the API key you have created.