Learn more about the Network List feature and Onomondo’s Network Marketplace.
In this article we will cover the following topics:
- What are Network Lists?
- What is the Network Marketplace?
- How to view available networks?
- How to create a new Network List?
You can watch the video tutorial below for a full overview:
What are Network Lists?
A Network List is a group of selected networks that the SIM is allowed to register on. These lists are custom created by the user within the Onomondo Platform.
IoT businesses can benefit from making their own custom network lists in a number of ways, such as:
- Having the full view of available operators, technologies, and prices allows users to create custom lists based on business goals.
- Deciding to create custom network lists within the platform so users do not need to receive permission or leverage additional tools.
- Switching networks a device can connect to at any time, so users can flip between networks to troubleshoot connectivity issues.
What is the Network Marketplace?
Let's now look at how you decide which networks you want to connect to. This is known as our Network Marketplace.
The Network Marketplace is a collection of over 700 RANs that have been fully integrated into Onomondo's core network. You can make network lists for your fleet by going to the Network Marketplace.
The Network Marketplace provides information about:
- Available networks
- Data costs
- SMS costs
- Access charges
- Billing increments
- And what technologies are available on that network
All of this can be filtered down to make for easy creation, too. Users can create a network list filtered by a variety of variables:
- Specific countries and regions
- Maximum price per MB
- Maximum price per SMS
- Available technologies
- Access charges on a network
As an Onomondo platform user, you can create an unlimited number of Network Lists. Having multiple network lists is important if you need different coverage for different SIMs and devices simultaneously.
This has been especially helpful for customers who want to either lower data costs in markets they already conduct business in, improve the coverage of their device, or enter new markets outside of where they already operate.
We also have a range of LTE-M and NB-IoT networks integrated with Onomondo’s network. To find out what LPWAN networks are available within your market, please contact Onomondo for more information.
How to view available networks?
The Network Marketplace is accessible within the Onomondo platform. Only users with the proper permissions will be able to view and edit a network list. These permissions are granted through the Tags functionality.
If you are a Developer Access user, you will have a single predefined list from the Network Marketplace. Enterprise Developer Access and Full Platform customers have the ability to create an unlimited number of network lists.
When you log in to the platform, go to the Network Lists tab to see the lists you've already made using the Network Marketplace. From here, you can edit an existing list or create a new one.
How to create a new Network List
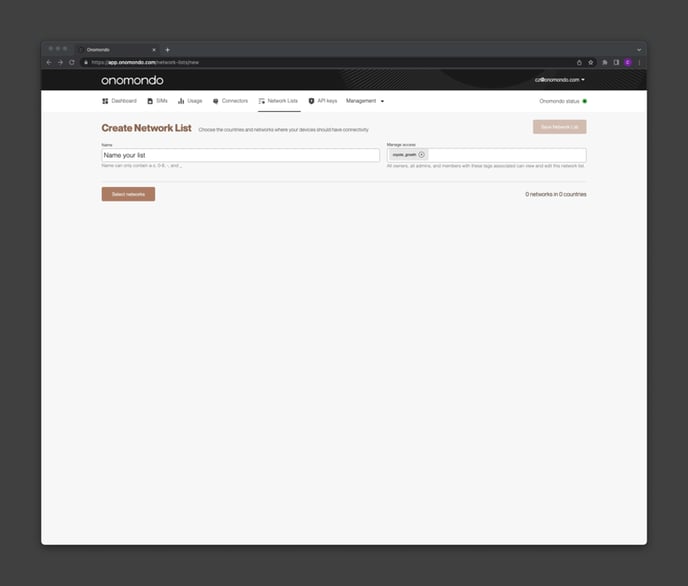
Step 1
On the Network Lists tab in the Onomondo platform, click New Network List. From here, you will be brought to a screen where you can name a list, or manage access to specific owners and admins.
After naming the list, hit Select Networks to open up the Network Marketplace.
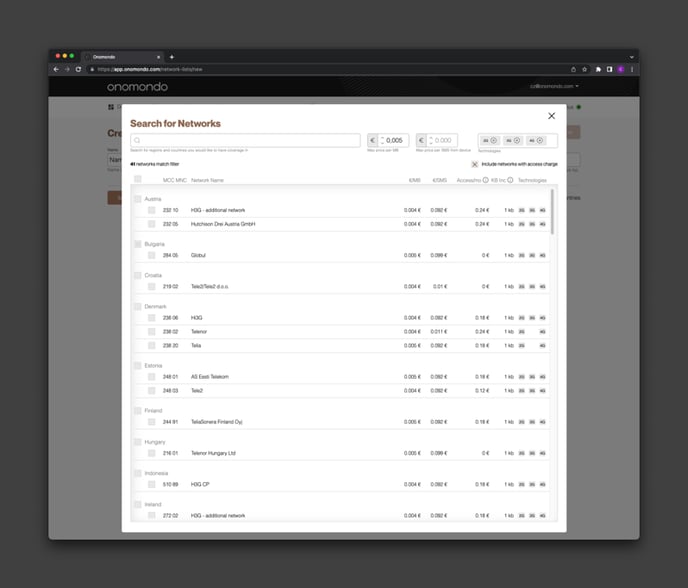
Step 2
In the Network Marketplace, you have the ability to search and filter for specific networks that meet your criteria. This list is in alphabetical order by country. To add new networks to your list, scroll down the country or search for it at the top of the screen.
You can also quickly narrow down your search by filtering by one of the following options:
- Maximum price per MB
- Maximum price per SMS
- Available technologies
- Networks with access charges
In addition to searching for countries, you can also search for entire regions, like South America or Northern Europe, to quickly see a group of countries.
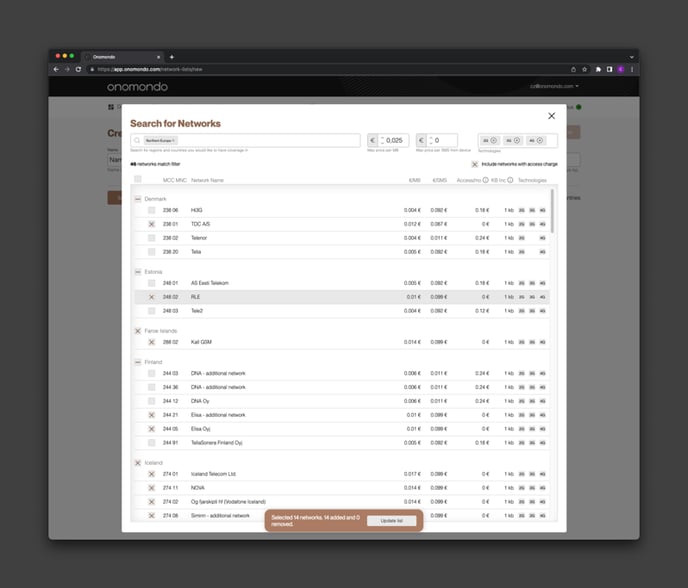
Step 3
In order to add networks to your list, you need to check the boxes with the networks you are interested in including. You can also use the checkbox at the top of the page next to the list headers to select all networks that match your filtering criteria.
You will see at the bottom of the page the number of networks that are selected, added, or removed from your current list.
If you would like to remove a network from an existing list, simply open up the list and uncheck those networks. You will see at the bottom of the Network Marketplace view the number of networks that will be removed.
Once you have selected all the networks you want to connect to, click the Update List button.
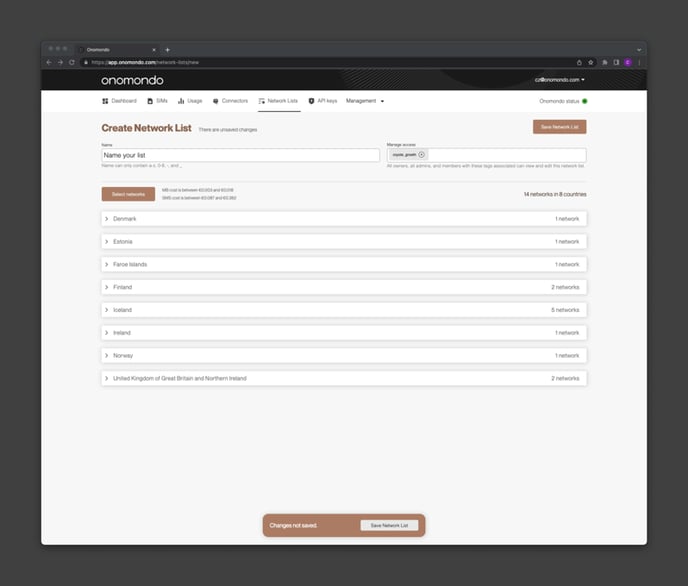
Step 4
You will be brought back to the list creation screen at this point, where you can see the countries and networks you’ve chosen. You can also click into each country to see the network information.
This page will also now provide an overview of the entire network list, including:
- MB cost range
- SMS cost range
- Total number of networks
- Total number of countries
When you are happy with the curation of your list, click Save Network List at the bottom of the page. Once an update has been saved, you can then assign SIMs to that list on your platform.