
Using a Azure Connector will help send data directly from your device to your Azure IoT Hub in a few quick steps.
Step 1: Necessary information from the Azure IoT Hub
The Microsoft Azure IoT Hub Connector requires the intermediate key, intermediate certificate, intermediate key password, and DPS ID Scope from your Azure instance to operate. You’ll find these in the Azure IoT Hub Device Provisioning Service.
Microsoft’s website has detailed documentation on how to manage device enrollments with Azure portal.
Step 2: Set up an Azure Microsoft Azure IoT Hub Connector in Onomondo
Now that you have your Azure IoT Hub information ready, you’re able to create a Microsoft Azure IoT Hub Connector in the Onomondo app.
- Log in to the Onomondo app https://app.onomondo.com.
- Go to Connectors, and click New connector
- Give your connector a name and select the connector type called Microsoft Azure IoT Hub Connector.
- Add the intermediate key and intermediate certificate to their respective fields.
- Type in the intermediate key password into the Password for intermediate key field.
- Copy the ID Scope from the overview in your Azure account into the DPS’s ID Scope field.
Find out more about our connectors here: What are Onomondo Connectors?
Step 3: Attach your new connector to your SIMs
Now you’re ready to attach the Azure Connector to your SIMs.
- In the Onomondo app, go to SIMs. Find a SIM you want to connect, and click Go to SIM.
- Click Edit SIM (the pencil icon) and add your connector (e.g. Azure Connector).
- Click Save.
Now your SIMs will automatically provision themselves in Azure IoT Hub when they come online – seamlessly and securely transmitting your data as messages.
Addendum: Getting started with Azure IoT Explorer
As the Onomondo Azure SIM is natively connected with Azure IoT Hub, the configuration of Azure IoT Explorer only requires one simple step.
All you need to do is configure the connection in Azure IoT Explorer following this guide: Azure GitHub guide - Configure an IoT hub connection.
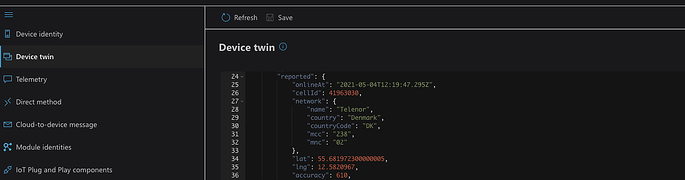
You’re now able to browse your automatically provisioned devices within Azure IoT Hub. There you can see helpful device information, such as which cellular network the Onomondo Azure SIM is attached to:
 Additionally, if you go to the Telemetry section in Azure IoT Explorer, you can view messages sent from any device using the Onomondo Azure SIM:
